Google Tag Manager Implementation
This guide will help you to implement Affilae Tracking via GTM.
Three main steps are required:
- Deploy GTM Tag.
- Add Affilae Tag to track clicks.
- Add Conversion Tag to track conversions.
Before you begin:
Before going further you must already understand the basics of how GTM works (e.g. Tags, DataLayer, Triggers, Preview Mode, Environment, Versioning …). You also need to understand our Tags behaviour.
Please note that those guidelines may not match your environment and Affilae can’t be liable regarding the usage of GTM.
Note that the usage of an AdBlocker may block Google Tag Manager.
Common issue:
To push a conversion on our back-end the Affilae Tag must be loaded before the conversion Tag.
If the conversion Tag is not triggered and, depending on your website and implementation, you may want to use the Window Loaded trigger. To add multiple trigger conditions you will have to create a Trigger Group. Once again this may change according to your triggering strategy.
You could also review following Clicks and Conversions checklist.
⓵ Deploy GTM
GTM must be deployed on your website, please follow the GTM documentation.
⓶ Add Affilae Tag
Once logged on GTM, select your workspace and create a new Tag from the Tags menu.
- Set a Tag name e.g.
tag_affilae - Copy your Affilae Tag and paste into the custom HTML field.
- Select the All pages trigger.
- Save and submit changes to your website via GTM.
Notes:
On the Tag do not forget to update the variable _ae to match with your program ID (e.g. 5f03acf00000000000000000)
⓷ Add Conversion Tag
The Conversion Tag must be added on your event page (e.g. sale, lead) and triggered once Affilae Tag is loaded.
Before going further you must understand GTM DataLayer User-Defined Variables.
This Tag will rely on GTM User-Defined variables to push your conversion data.
You will have to create those variables on GTM and update your DataLayer (i.e. DL) accordingly.
For each required conversion data (e.g. orderId, amount …) you have to create one User-Defined Variable on GTM and your website have to push the information to the DataLayer.
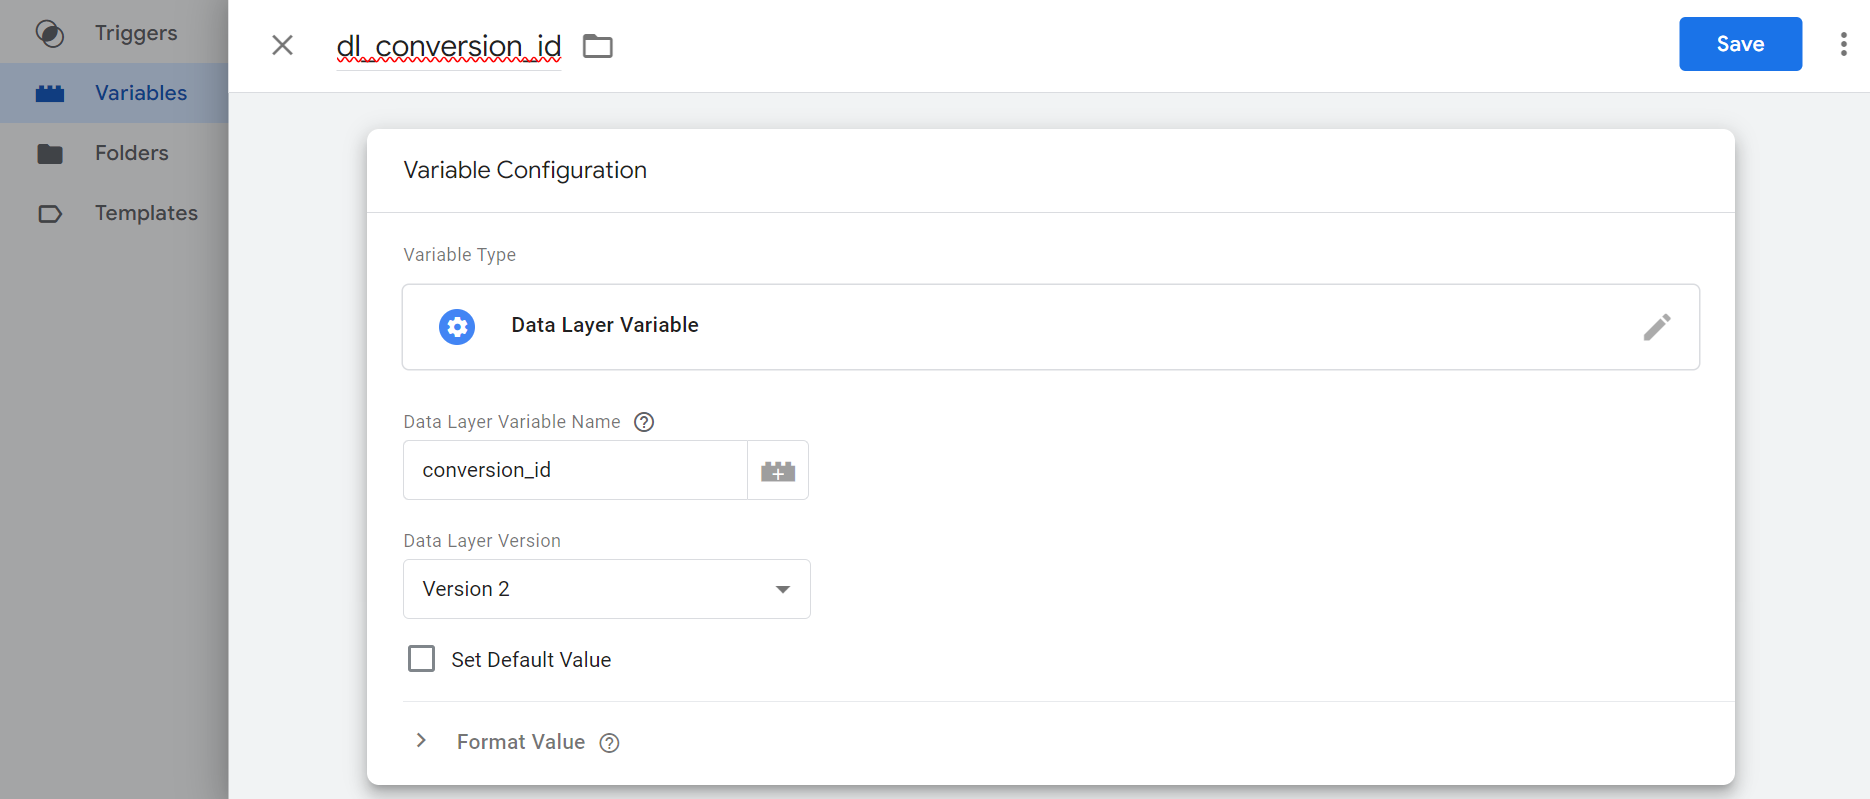
Variables
Once logged on GTM, select your workspace and create a new Data Layer Variable from the Variables menu.
- Name your variable e.g.
dl_conversion_id - Map it to your DataLayer key (e.g.
conversion_id)
If required do the same for remaining conversions variables i.e. the amount, paymentType, subId, voucher.
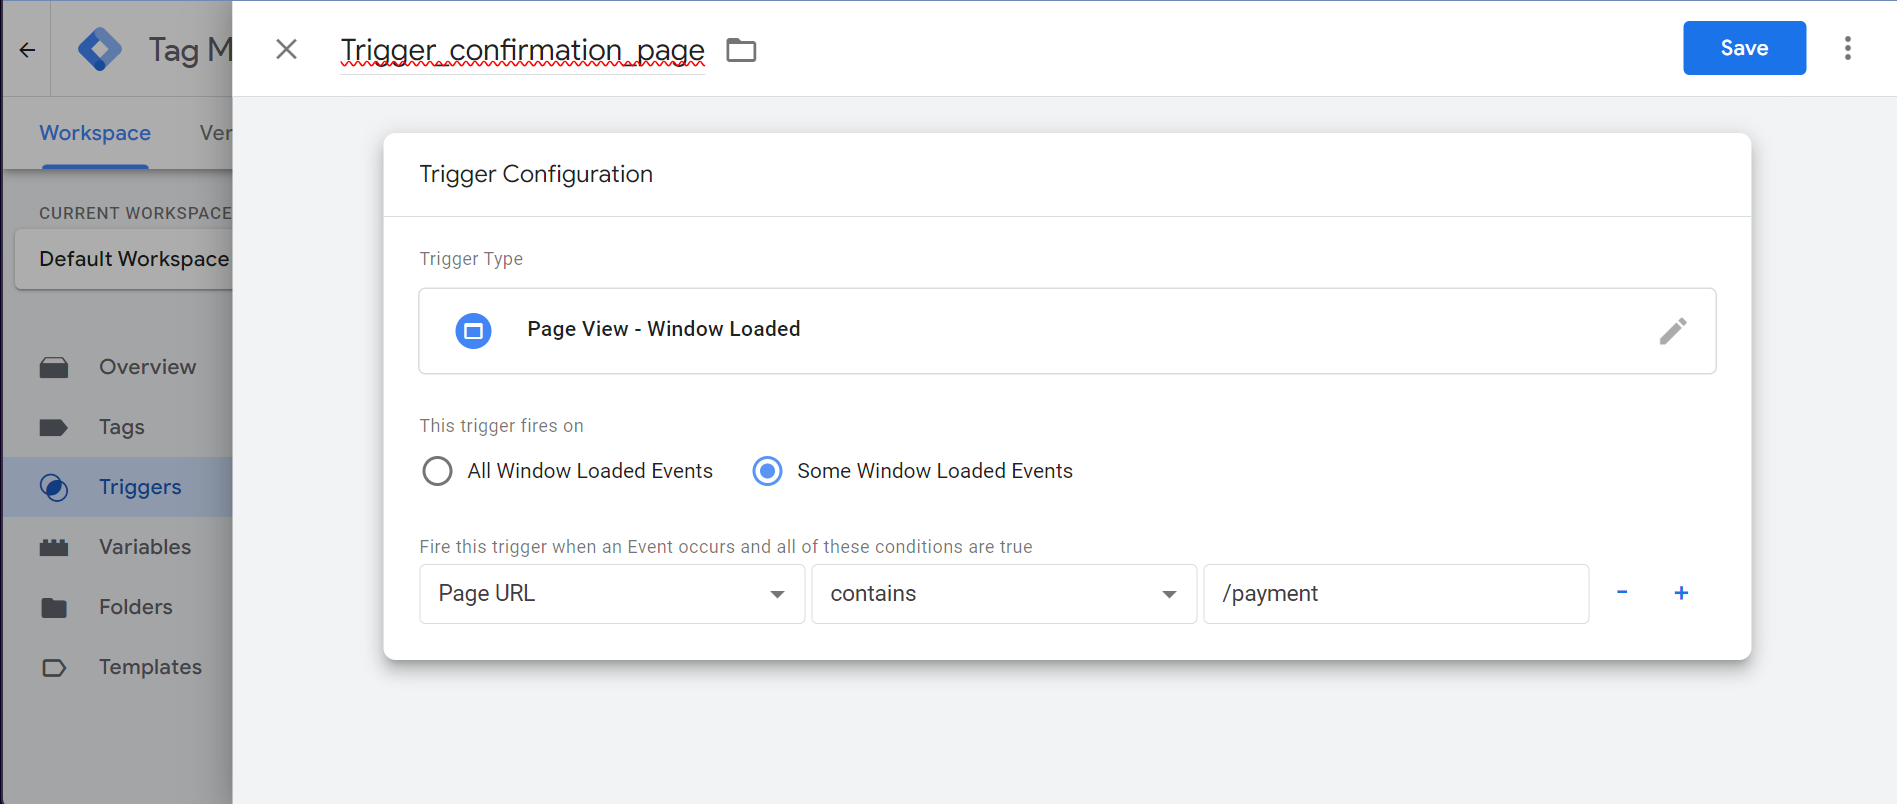
Confirmation page Trigger
Once logged on GTM, select your workspace and create a new Trigger from the Triggers menu.
- Name your trigger e.g.
trigger_confirmation_page - The preferred Trigger Type is Window Loaded.
- This trigger must be used on your confirmation page to call our conversion Tag. The condition of the trigger may vary, a common approach is to match the URL with a RegEx.
Conversion Tag
Once logged on GTM, select your workspace and create a new custom HTML Tag from the Tags menu.
This conversion Tag will be triggered by the confirmation page Trigger previously created.
- Name your Tag e.g.
tag_affilae_conversion - Copy the conversion Tag and paste into the custom HTML field.
- Update the Tag according to your variable, e.g.
event.Conversion.id = {{dl_conversion_id}} - Select the trigger previously created
trigger_confirmation_page
You will find your script in the configuration of your programme in the « tracking » tab via the « custom integration (scripts) » section, « track conversions ».
- Once the Tag has been installed and the variables filled in, click on the « Trigger » table, the triggers menu will appear and all you have to do is select the Trigger you created in the previous step.
- Save and send your changes.
Your tracking configuration is now complete. Before launching your Affilae program, check that your configuration is working properly by carrying out test conversions to verify that the tags are triggered correctly, that the variables you have created are showing up correctly and that the clicks and conversions are showing up in the Affilae platform.
The above steps should be repeated for each Affilae program you create as each program will have a different Program ID but depending on your Affilae programs you could potentially re-use certain Variables and Triggers without having to create new ones.
Notes:
You can leave unused variables with empty strings.
You can have multiple Tags to implement if your program has more than one rule.
The key information to send with the conversion is a static value. This will be different for each rule created (e.g. 5f025b700000000000000000-5f0118000000000000000000). This information is available on the back-office.
Common issue:
To push a conversion on our back-end the Affilae Tag must be loaded before the conversion Tag.
If the conversion Tag is not triggered and, depending on your website and implementation, you may want to use the Window Loaded trigger. To add multiple trigger conditions you will have to create a Trigger Group. Once again this may change according to your triggering strategy.
You could also review following Clicks and Conversions checklist.